|
|
Roger's Aquatics Pages |
A trickle filter is a type of external filter where the water is allowed to trickle over the media in air.
In a "Normal" filter the filter media is submerged, so that the only oxygen the bacteria get is supplied in the water that is pumped through the filter. The bacteria in the filter require oxygen for Nitrification. If there is insufficient Oxygen then full Nitrification cannot take place. In a trickle filter the water is allowed to trickle over the filter media, so that the media is kept damp and in air. Because of this there is always plenty of oxygen and so Nitrification can is not restricted by the amount of oxygen in the water
This is the type of Filter used in commercial water treatment and Sewage plants. The quantity of Ammonia (as Urea) in sewage is much higher than you would find in an aquarium, so much more oxygen is required. Similarly in tanks with a high density of fish, such as a Malawi Cichlid tank, a tank with large fish, or a marine fish tank has to control the levels of Nitrite and Ammonia much more thoroughly. In there circumstances a trickle filter is much more suitable. Of course a trickle Filter is also useful in larger tanks, and there is nothing to stop you using one in any tank.
My trickle filter is on my 648 litre Malawi tank. I built it about 2 months before the date of writing.
Nitrite and Ammonia have been zero since it was installed. The tank previously had an external power filter,
this was run in parallel while the tickle filter was becoming established.
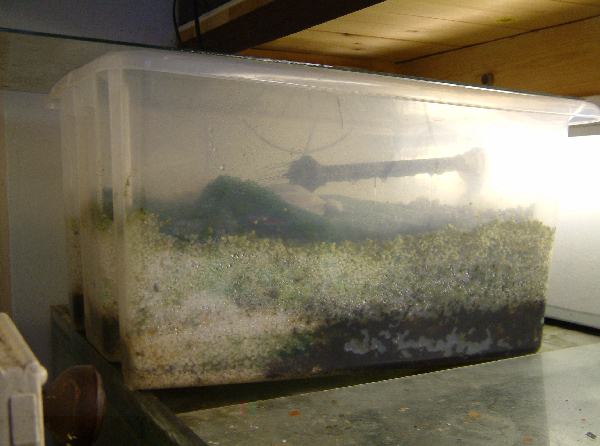
My trickle filter - click on the above for a larger picture - 32KB
The filter is made from a commercial clear plastic box approximately 500mm long, 350mm wide and 300mm deep. This is ample for a tank of up to 700 litres. It is an overhead filter, this is by far the simplest to build, but it does have the two disadvantages.
Firstly it is rather ugly and difficult to conceal. In my case it is in the fish room, so it does not matter and is in the open. If you were to put it on a show tank, then you would need to consider how to conceal it. This would mean a very large hood over the tank - probably not a problem for a really large tank.
Secondly if it is placed directly over the tank it will reduce the light to the tank making plant growth difficult. Once again in my tank this is not a problem as it is a Malawi tank and there are no plants, so the light is only to make the fish easy to see
The box. I chose a plastic box, but it could equally be acrylic or glass. I have previously made one from an acrylic tank. You could make your own glass or acrylic box, this would have the advantage that you could shape the box to fit the space available.
Pipe connections. You will need 2 elbow Tank connectors. I used UK style 21.5mm overflow connectors. You could equally use plastic plumbing. As this varies from country to country and system to system I will not attempt to suggest what is best suited. Visit a plumbing supplier and see what they have.
Powerhead. The water is driven round the system using a powerhead. I use an 800 litre per hour Aquaclear. The choice is yours and should be chosen to fit the tank.
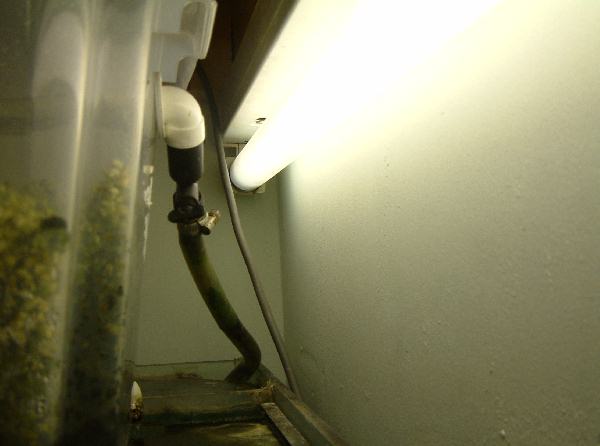
Piping You will need sufficient tubing to run from the powerhead in the tank to the upper tank connector
Spraybar I used an old airlift from an undergravel filter drilled for the purpose. Ideally is should had holes drilled both sides to get a good head of water. The end is filler with a fountain head I had laying around.
Sundries You will need a method for connecting the pipe from the powerhead to the upper elbow. Once again I used pits of a pond fountain I had laying around and a pipe clamp. You will need to source bits to fit depending on the bore of your pipe and the size of the tank connectors. You may also need some adhesive - use plumbers plastic pipe weld, or polystyrene cement. I also put a grid over the exit pipe to prevent the filter media washing back into the tank. This was salvaged from a broken corner filter.
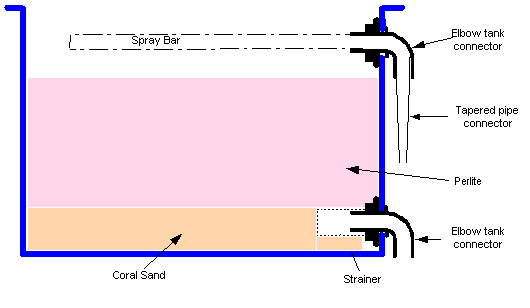
Filter media You could go out and buy commercial filter media, but this would cost a fair bit, and the idea is to do this on the cheap. The media should be inert and allow a good growth of bacteria. At a pinch you could use gravel. My media is in two parts, the base is Coral Sand as it is a Malawi tank and I want to stabilise pH. Unless you have alkaline/Hard water fish or marines it should be omitted. The rest is made up of Perlag and Perlite. These are siliceous rock (a kind of natural glass). Perlite has been heated to expand it and is, as the name suggests much lighter.
I will assume you already have a box, if not you will need to build your own from acrylic or glass. The box will need two holes drilled. One at the top and one at the bottom. The hole at the bottom is a drain so does not need to be central and can be in the side or actually through the bottom. Mine is in the side, but you should put it in an appropriate place for the water to drain back into the tank.
Drilling the hole is easy if you are using plastic/acrylic but much harder if using glass. With plastic or acrylic use a plumbers hole saw. These are quite expensive for a professional quality saw, but the are available for very little from cheap hardware stores. The cheap ones are good enough for a couple of holes, but blunt quickly.
With glass you need a proper glass drill. These are expensive, and you would do better to get this done professionally. Get the glass drilled before assembly if you are making a glass box.
The top hole should drilled centrally. The bottom hole drilled in a suitable place to return to the tank.
Each hole is then fitted with a tank connector.
The inlet connector - Click on the image for a larger (32KB) version.
In my case a reducing piece was needed to connect the pipe, which is of much smaller bore. This was glued in place using plumbers pipe weld and the tube fitted using a pipe clamp. The bottom elbow is left empty and pointing downward so water can flow back to the tank.
I then fitted the spray bar to act as a sprinkler to the inside of the tank and filled with media. Then
positioned the powerhead connected to the pipe in the tank as far as possible from the filter outlet and turned on.
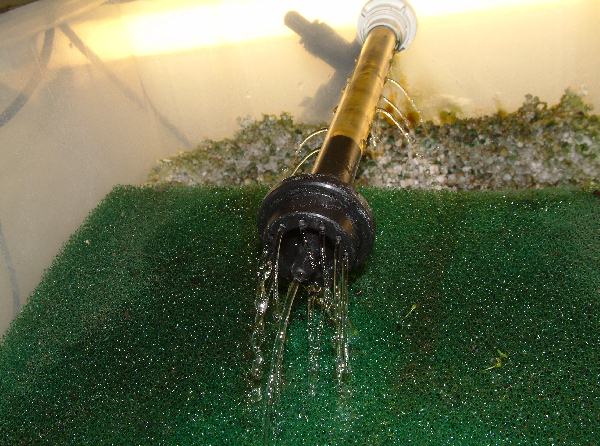
The spray assembly in my filter - click for a large (32Kb) image.
You will notice that in the above there is a sponge over the media. I found this was necessary as the Perlite is so light it tends to get washed away and pits appear in the media. The sponge acts as a buffer. It has two added benefits, it spreads the water flow more and acts as a pre-filter, to take any bits out of the water. This makes cleaning the media easier as you just remove the sponge and wash it. The discoloration of the Perlite as the back is due to the growth of algae. This is nothing to worry about, in fact it acts as a Nitrate absorber.
It is important to cover the filter to reduce evaporation. However, the cover must not be air tight, to allow the air to refresh and pass oxygen into the filter bed. I use a simple glass sheet, although anything will do, so long as there is some ventilation.
It has now been several years since I wrote the above, and I've made a few changes.
Firstly the box is now bigger and filled with Perlag (fires Clay Balls) not Perlite. I found that no matter what I did the Perlite would eventually make its way into the tank and float around. Perlag has an added advantage that it also large enough to be colonised by de-nitrifying bacteria, so the Nitrate level does not build up.
I have also up-rated the pump to a pond pump running at 2000l/hour. This feeds via 21.5mm overflow pipe from the pump. This has made it necessary to add a second exit elbow. The uprating was not due to any problems with nitrite or ammonia build up. It was simply that I found that the powerhead I was using was not robust enough and the impeller kept breaking.
The third improvement was an overflow. I found that with time muck built up in the filter bed until the flow rate out was less than the flow in, with the obvious result. I ran a third pipe from above the filter media straight out through the side. When the water starts running through that it is time for a media cleaning session.
This is somewhat more difficult, as the water won't make its own way back into the aquarium when it has reached the bottom of the filter. It needs to be pumped. The normal way to arrange this is to feed the trickle filter by gravity. The trickle filter then drains into a sump, from where it is pumped back into the tank.
The gravity feed cannot simply be a siphon, because if the pump were to fail or jam the aquarium would empty into the trickle filter, with disastrous results. The best way to gravity feed your filter is to drill the aquarium. Drilling glass is not easy, and my be best left to a professional. The hole should either be just below the water level, or though the bottom of the aquarium. For bottom drilled tanks a pipe must be fitted to the inside so that water is taken from just below water level. It is also possible to arrange a siphon so that the flow stops if the water level drops too low. The water drawn from the top of the tank is then fed to the input side of the trickle filter.
The output is allowed to flow into a sump. The sump must be large enough to hold any water that will flow from
the aquarium if the pump should fail. Water from the sump is then returned to the aquarium by a pump. This can
be a normal aquarium powerhead, a pond pump, or the sort of pump sold in garden centres for water features. If the
pump is sized so that it can return the water to the aquarium faster than the drain can feed water from the aquarium
it must not be allowed to run dry, so is should be connected to a float switch so that when the
water in the sump gets too low the pump cuts out.